INTRODUCTION TO WOODTURNING
Chapter 12: The ‘V’ cut
12.1 Introduction
Having roughed down and planed the practice piece the next step is to tackle the 'V' cut. This cut is made with the corner of a chisel. Because it is made with the corner, it can be made with a chisel of almost any width. This includes the 3/8 inch square beading and parting tool which can be used as a chisel for this operation. Many turners may find a narrower tool, such as this, somewhat easier to use. Nevertheless, when I am teaching I start with the 1 1/4 inch skew.
I do this primarily to help to overcome any lingering fears the student may have concerning this tool.
A chisel has two corners, which are often called points (as they will be here). If the chisel is ground square, like the beading and parting tool, it does not matter which of the points is used for the 'V' cut; but if it is a skew then the points are formed at different angles (see Diagram 12.1). In that case the long point should be used.
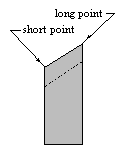
Diagram 12.1 Naming the points of the skew chisel
There are two main methods of making the 'V' cut. I call these the 'push' method and the 'swing' method. In practice these can be used in combination to form a hybrid of the two methods. I consider the swing method to be the 'proper' way of making this cut because with practise it is more natural and effective. The novice should be encouraged to persevere with it because it helps to hone skills which are required for other operations, such as forming beads, which will be described in the next chapter.
12.2 The swing Cut
To begin this cut a very small notch is made, at the position where the 'V' is required, using the long point of the skew chisel. To prepare to do this the chisel is held with the long edge on the rest, the blade vertical, and the point well up on the work piece but just clear of the wood. The handle is lifted so that the point swings into the wood to make a small mark and then lowered to withdraw the point (see Diagram 12.2).
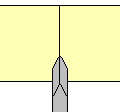
Diagram 12.2 Marking the position of the 'V'
Subsequent cuts are made with the chisel leaning to either side. The top edge is leaned to the left for a cut on the left side and to the right for the right side (see Diagram 12.3) Whilst the cuts are being made the slope of the cutting edge indicates the direction in which the cut should be made.
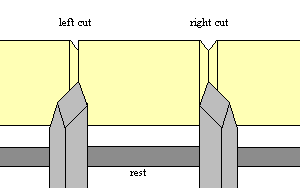
Diagram 12.3 Leaning the chisel when making a cut
At the beginning of the cut the bevel should be held at a tangent to the surface of the work piece (see Diagram 12.4).

Diagram 12.4 Position of the tool when starting a cut
Assuming a cut is being made on the left side of the 'V' the handle is swung up and to the left in a straight line so that the point cuts a straight line down the side of the 'V'. In doing this the rest, of course, is used as the pivot point. This being so, it is a matter of straightforward geometry to observe that the handle must sweep through a plane which is inclined at the same angle as the side of the 'V'.
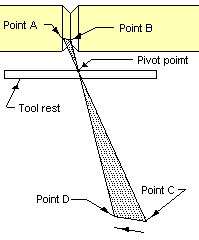
Diagram 12.5 The movement of the tool
This is shown pictorially in Diagram 12.5. As the cutting point is moved from A to B the tip of the handle must move from C to D. All four points, A, B, C, and D, and the shaded area in between, lie on a single plain. Note that point D is well above point C.
The reader may think that I have laboured this point and it may seem obvious on paper, but I have found that beginners have difficulty in translating theory into practice. What often happens is that, when observed from behind by the instructor, the tip of the handle can be seen to move in a kind of reversed 'J' movement instead of a straight line. The result is that the form of the 'V' leaves something to be desired. The beginner should try to avoid this.
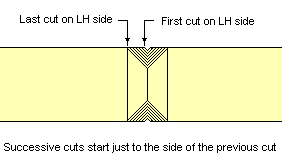
Diagram 12.6 forming the 'V'
Successive cuts start just to the side of the previous cut. Very small amounts of wood are removed with each time (see Diagram 12.6). It is customary, but not absolutely necessary, to make successive cuts on alternate sides of the 'V'. This not only enables the turner to cut away the waste cleanly but also helps to keep the 'V' in the required position. The turner should try to make each cut in a continuous sweep from the entry point to the bottom of the 'V' taking only a thin shaving. If an attempt is made to remove too much wood the point may catch. Good lighting and good eyesight are required for this. Turners wearing glasses with bifocal (or varifocal) lenses should ensure that they focus properly at the required distance.
12.3 Points to note
As the 'V' gets deeper a number of points must be observed. The first is that there must be some clearance between the cutting edge of the chisel (above the cutting point) and the wall of the 'V'. This is illustrated in Diagram 12.7 which shows a view from the back of the lathe looking towards the turner. If this clearance is not maintained the edge may catch on the part of the work piece marked Point A in the diagram. The result may be an ugly spiral gash in the wood.
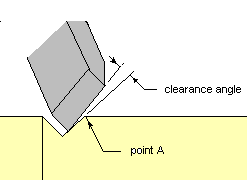
Diagram 12.7 The clearance angle
When Diagram 12.7 is given careful consideration it will be noted that only the lower edge of the bevel can be made to rub on the side of the 'V' (see Diagram 12.8). But this is enough to allow the turner to maintain control of the tool.
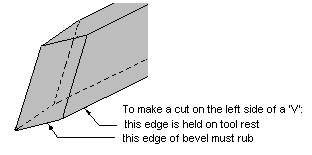
Diagram 12.8 The bevel
It should be noted that in order to keep the corner of the bevel rubbing on the side of the 'V' the tool must be pointed at an angle to the work piece. Diagram 12.9 Shows the position for the left-hand side of the 'V'.
Diagram 12.9 The angle at which the tool
is held for the swing cut
This angle is the opposite to that which many beginners expect. For a cut on the left-hand side of the 'V' the handle should be held to the right of the cutting point so that the edge of the bevel is more or less at a right angle to the axis of the workpiece. This can be seen by careful consideration of Diagram 12.9.
12.4 Summary of points to watch when making the swing cut
- Start the cut with the bevel rubbing (see Diagram 12.2).
- When making a cut ensure that the tool is held at the correct angle to the axis of the workpiece (when seen from above, as in Diagram 12.9).
- Keep the bevel rubbing on the wall of the 'V' (see Diagrams 12.8 ang 12.9).
- Maintain the clearance angle (see Diagram 12.7).
- Move the tip of the handle in a straight line (see Diagram 12.5)
12.5 The push method
Before this cut is commenced the tool rest is positioned so that the top edge is level with the axis of the workpiece. The first cut is a small notch which is made with the long point of the skew, as was done for the swing cut. Then the tool is held in a horizontal position and, when observed from above, at an angle to the axis of the workpiece, as shown in Diagram 12.10.
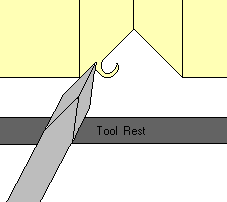
Diagram 12.10 The angle at which the tool is held for the push cut
This angle determines the slope of the side of the 'V'. To make the second cut the tool is simply pushed into the workpiece slightly to one side of the notch and penetrating a little deeper. The third cut is a repeat of the second cut but is made on the other side of the notch. These cuts can then be repeated with each successive cut on opposite sides.
12.6 A comparison of the swing and push cuts
The reader may have noted that although the swing and the push cut produce very similar results the techniques applied are very different.
If diagram 12.9 and 12.10 are compared it will be seen that, to cut the same side of the 'V', the tool is held at opposite angles. Also, whereas for the push cut the tool is held in the horizontal plane, for the swing cut the tip of the handles is held down so that the cut can be started with the bevel at a tangent to the surface of the workpiece.
When teaching beginners I find that many tend to slip into the push cut because they do not start the cut high enough on the work piece, that is, with the bevel rubbing. However, as long as the cut is made successfully, without the tool catching and ruining the work, that is not really a problem. But I do draw their attention to what is happening.
It will have been noticed that the push cut is very much easier to describe than the swing cut. In practice, however, it will not necessarily be found easier to perform. The beginner should try both methods to see which is best for him, although, as I said earlier I try to encourage students to use the swing cut.
12.7 Problems and accidents
It should be noted at this point that many novices find learning to cut both 'V's and beads difficult and, as a consequence, have many 'accidents' along the way. In this context, by an 'accident' I do not mean something which is physically threatening, or dangerous, to the turner, but something which damages the work. What can happen in trying to perform a 'V' cut or roll a bead, is that the tool catches, it then spirals out of the cut and along the workpiece forming a horrible ragged gash in the wood.
Such an accident is part and parcel of the process of learning to turn. The beginner should accept this philosophically and just keep trying. With practise these problems should occur less and less frequently.
It is often difficult to understand precisely what mistake has been made in causing this to happen. Most often it is probable that the heel of the bevel has been allowed to lift from the rubbing position. As a consequence the cutting point has penetrated too far and buried itself in the wood. As the wood continues to revolve, and the tool is supported by the rest, something has to give. That something is the wood. The edge of the tool catches and then acts as an efficient screw-cutting device, leaving the ragged spiral referred to above.
Why do beginners have problems of this kind? One reason is that the turner has to try to watch a number of things, such as keeping the bevel rubbing, maintaining the clearance angle, and controlling the speed and the direction of the cut, all at the same time. This is difficult at first and practice is required to get it all together.
If an accident does happen and a spiral is cut into the work the turner should immediately start again on an undamaged part of the workpiece. If an attempt is made to continue working on the damaged portion the point will probably catch again, in one of the accidental grooves, making still more of a mess.
|