INTRODUCTION TO WOODTURNING
Chapter 8: Introduction to spindle turning
8.1 The basic cuts
When I am teaching students on my courses I always teach spindle turning before end grain or bowl turning. The reason for this is that it provides a pattern of learning in which the student proceeds in a short series of simple, easy to understand, steps. These steps pretty well programme themselves and provide a structured introduction to the discipline of woodturning. When they come to bowl turning students can then be shown how to adapt the principles they have learned to the new form.
There are only a small number of basic cuts used in spindle turning. Once the turner has learnt to perform these correctly he can, in principle, turn anything between centres.
Assuming that we are starting with a square blank these cuts are as follows:
- Roughing down to a cylinder
- The smoothing/or planing cut
- 'V' cuts
- Forming a Bead
- Forming a cove
- Blending beads and coves
- Squaring the end
- Rounding the end
- Cutting pummels
8.2 Roughing down
Let us look at these cuts in sequence so that the reader knows where he is going.
The first job to be done when undertaking a piece of spindle turning is to 'rough' down the square blank to a cylinder. This is done with a large gouge normally used only for this particular operation. Not surprisingly it is called a 'roughing out gouge' (or roughing gouge). The operation gets it name from the fact that the gouge leaves a rough surface; it can also be a fairly crude and brutal operation. For professional, for example, it is a job which needs to be done as quickly as possible so that the interesting work can start.
8.3 The planing cut
The planing cut is analogous to the use of the smoothing plane in general woodwork. It is done with a chisel immediately after roughing down. the skew chisel is used to produce a good surface which should require little sanding.
8.4 The 'V' cut
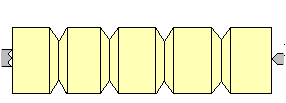
As the reader will anticipate the 'V' cut is used to make a 'v' shaped depression in the work piece (see Diagram 8.1). Such a cut may be made for its own sake, as part of the decoration of the work piece; but often is made as the first step in the cutting of a bead or similar operation.

Diagram 8.1 'V' cuts
8.5 The bead
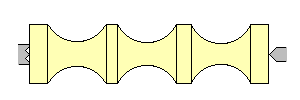
A beaaning cutd is a form of decoration running round a piece of turning which is roughly semicircular in cross-section (see Diagram 8.2). It is upstanding like a hill.

Diagram 8.2 Beads
8.6 The cove
A cove is the opposite of a bead. It is also roughly semicircular in cross-section but forms an indentation like a valley (see Diagram 8.3).

Diagram 8.3 Coves
8.7 Blending beads and coves
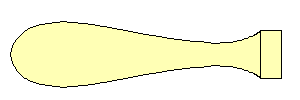
As suggested above the profile of a true bead or cove approximates to an arc of a circle, very often, but not always, approaching the full semicircle. They are often applied as a form of decoration. In other cases, however, the form of the the item being made will call for more gentle bumps or hollows. Often these will flow together. One example is the handle of a turning tool (see Diagram 8.4). Blending bumps and hollows together calls for an extension of the skills used for cutting beads and coves.

Diagram 8.4 Blending a bead and a cove to form a handle shape
8.8 Squaring the end
Sometimes it is necessary to cut the end of the work piece square with a perfectly clean cut, that is, one without any torn fibres. This cut is similar to that for a 'V' cut but many turners find it rather more difficult.
8.9 Rounding the end
There are occasions when it is necessary to make the end of the work piece completely round. This is not dissimilar to cutting a large bead but it is useful to consider it as a separate exercise because there are come additional points which can be made.
8.10 The pummel
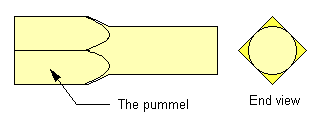
At times, when making items such as table or stool legs, it is necessary to leave sections of the work piece unturned and in the original square condition. This, therefore, requires making a transition from the square section to the round. The section which is left square is called a pummel (see Diagram 8.5)

Diagram 8.5 The pummel.
|