Home | Intro to WT

INTRODUCTION TO WOODTURNING

Chapter 6: Making the cut

6.1 General introduction

This chapter, and the one which follows, deals with the general way in which the turning tool is controlled so as to produce a good clean cut. This should leave the wood with a smooth surface unmarred by torn fibres. In later chapters instructions will be given on how to perform the specific operations by which the range of basic shapes, which form the fundamentals of woodturning, are produced. A description of these basic forms (or cuts)is given in Chapter 8. This present chapter is concerned with the factors which are common to all these operations.

In considering these factors we will start with the position of the body and end with thoughts on the direction of the cut in relation to the grain of the wood in the following progression:

  1. the position of the body (the stance)
  2. the way the tool is held in the hands (the grip)
  3. the attitude of the tool (the rubbing bevel)
  4. the way the correct attitude of the tool is maintained
  5. the direction of the cut in relation to the grain.

This analysis will focus on the use of cutting tools, eg chisels and gouges. Some thought will be given to the use of scrapers in a later chapter .

6.2 The correct stance

When first learning to turn it is vital to adopt the correct stance. There are two main reasons for this. One is that the turner will be standing at the lathe for long periods - the adoption of the correct stance will help to reduce the fatigue that this entails. The other, with which we are particularly concerned here, is that much of the control of the turning tools comes not only from the hands but from body movements. Often, when making a cut, the body and the hands should move as one. It will be found from experience that it is much easier to maintain the tool in the correct attitude if the body forms a firm platform for the hands.

Initially, when the turner is preparing to make a cut on a work piece held between centres, the body should be balanced on both feet with the legs and trunk more or less vertical without any twist. If the top half of the body is bent over very far then it will not be long before backache sets in. The position of the feet is important; they need to be close to the lathe so that the turner can reach the rest without bending very much. The position of the feet also determines the orientation of the body in relation to the axis of the lathe. A slightly oblique position is suggested; that is to say a line drawn through the shoulders should cut the axis of the lathe at an angle of somewhere around 15 degrees. So the feet need to be a little distance apart and pointing in the correct direction (see Diagram 6.1).


Diagram 6.1 The position of the feet

The stance should also be compact with the elbows kept close to the sides of the body. Because of this the right hand (of a right handed person)should be positioned to hold the tool just below the ferrule. Tool handles are usually made considerably longer than required for many operations. When the right hand is held too far back the elbow is pushed away from the body, ie behind and to the side. If this happens there is little to stop it wobbling around out of control and the necessary movements of the wrist and fingers are seriously inhibited. The forearm should be kept in line with the tool so that the fingers, and the wrist, can easily rotate the tool around its axis.

In carrying out a cut movement must take place. But, as far as is practical, the movement should be confined to the body rather than the hands or arms. In carrying out the planing cut, for example (see Chapter 11) the tool is traversed along the work piece by means of a sideways movement of the complete body.

Let's take a detailed look at the situation of a right-handed person making such a cut from right to left. The feet are positioned so that the body is in the oblique position with the right side furthest from the lathe. At the commencement of the cut the weight of the body is shifted onto the right foot with the body leaning slightly to the right. As the cut is made, and the tool is moved along the wood, the weight of the body is transferred from the right foot onto the left so that the body is leaning in that direction. Whilst this action is being carried out the body should not be allowed to twist and the upper arms should maintain a constant position in relation to the trunk. The movement of the lower arms and the hands should be limited to the extent of keeping the tool in the necessary attitude.

It must be emphasised that the above description is only meant to give an approximate indication of the required stance and accompanying movement. Each turner should take up a stance which he finds comfortable. This description has been applied to turning between centres but the general idea behind it also applies to end grain and bowl turning - that is to say, in these activities as well the body must do as much of the work as possible. Generally speaking the stance should also be compact but bowl gouges have long handles and the turner may stand somewhat further away from the lathe. Then the right hand, holding the end of the handle, may be allowed to rest on the body somewhere in the region of the hip.

6.3 The grip

This leads to the question of the grip. In the case of the left hand there are two basic ways of holding the tool: the overhand grip and the underhand grip. I tend to alternate between one and the other according to circumstances. It is difficult to specify what these circumstances are but they are not critical. The novice should experiment to see which seems to be the most comfortable in various situations.

With the overhand grip the hand is on top of the tool and normally all the fingers are wrapped around the blade with the thumb underneath and the palm facing downwards. With the underhand method there are two possible grips. One is similar to the overhand grip but with the hand underneath and the palm facing upwards. In the other, which is used when more sensitivity and control is required, the hand is positioned underneath but the blade is held just by tip of the forefinger and the thumb. As the tool is manoeuvred the tips of some of the other fingers may come into play.

In the case of the right hand there is a similar choice between the palm grip, where the fingers are wrapped around the handle and the palm is in contact with it, and the finger grip, where the handle is held between the tips of the fingers and the tip of the thumb. The finger grip is mostly used on spindle work when sensitivity and control are required for the more delicate work, such as cutting a small bead. This grip is difficult to master and the novice is advised to use the palm grip.

6.4 Controlling the cut

Having looked at the stance and the way the tool is gripped we now need to look at the position in which the tool should be held so as to produce a clean cut. Wood cuts best when the fibres are severed cleanly and not ripped out of the wood. This is achieved by keeping the bevel of a sharp cutting tool in contact with the wood, i.e. keeping the bevel rubbing in short. As will be shown later it is important to cut with the grain as much as possible.

How is the contact between the wood and the bevel maintained? Diagram 6.2 shows a properly ground tool with the underside of the bevel correctly positioned, flat on the wood. In this position the bevel is said to be 'rubbing'. As shown in the diagram there are two forces acting on the tip of the tool. Force A represents the resistance of the wood to be cut which has the effect of pushing down the cutting edge into the wood. Force B represents the resistance of the wood to the flat of the bevel.


Diagram 6.2 The tool in the cutting position

In many circumstances, if the tool is maintained in the attitude shown, force B and the downward component of force A and will be virtually equal and the tool will cut smoothly with the turner having to do little other than push the tool along. It is often possible for an experienced turner to make a cut using only one hand (on the handle). At other times, however, because of the uneven consistency of the wood, the tool may have a tendency to bounce. In this case the turner may have to apply some downward force in order to keep the bevel in contact with the wood.

How is the correct attitude of the tool maintained? Let us think first of all about the situation faced by a woodcarver who is pushing the tool along with his hands. It can be seen from Diagram 6.2 that if the tip of the handle is moved down in the direction of arrow C the tool will pivot about point Y (the heel of the bevel), the cutting edge will lift, and the depth of cut will be reduced. If, on the other hand the handle is raised, point Y will lift off and the cutting edge will go deeper into the wood, so taking a bigger cut. If this process is not terminated the edge will continue to bury itself in the wood. In order to regain the control the carver will have to lower his hands until point A is again in contact with the wood and the bevel is rubbing. In moving his hands up and down to control the depth of cut the carver is in effect using the heel of the bevel as a fulcrum.

The situation is very much the same for the turner except that he has to use the tool rest to help him to control the tool. Because of this control is exerted not just be raising or lowering the handle but also by making small adjustments to the amount of the tool extending over the tool rest. The latter adjustments are very subtle and tend to be performed automatically by the experienced turner. The way to gain this skill is not to think about the position of the tool in relation to the tool rest but, instead, to focus attention on the use of the bevel.

6.5 Problems caused by a badly sharpened tool

On all cutting tools the bevel must either be flat or concave (ie hollow ground); it must never be convex. Two of the problems created by rounding off the bevel of a tool when sharpening are illustrates Part A in Diagram 6.3. One is that the effective bevel angle is greatly increased, so reducing the efficiency of the tool; the other is that there is a very good chance that when the major part of the bevel is rubbing the tool will not cut at all. Part B of this diagram shows that in order to get the tool to cut the heel of the bevel will have to be lifted well clear of the surface. In this position the cutting edge has very little support from the bevel and is likely to force its way into the wood, producing a 'dig in'. Clearly, unless the bevel of the tool is either flat or hollow ground the tool will be difficult to control.


Diagram 6.3 A badly sharpened tool

6.6 The concept of the rubbing bevel

In the foregoing I have referred to the need to keep the bevel flat (ie, rubbing) on the wood. For convenience it has also been assumed that the wood is flat. On a flat section of wood either the whole of the bevel must rub or none of it. But on a curved piece of wood (and most surfaces of a piece of turnery are curved) it would seem to be impossible for the whole of the of the bevel to rub. On an inside curve, e.g. on the inside of a bowl, there will be contact at two points, on the cutting edge and on the heel. In theory, on an outside curve only a small part of the bevel, that adjacent to the cutting edge, can be in contact with the wood. Nevertheless, it can be argued that the concept of the rubbing bevel is one of the most important in the woodturning process.

Some years ago there was a debate in one of the woodworking magazines (in the UK) between two experienced turners; one of them insisted that the bevel must rub all of the time the other disagreed strongly.

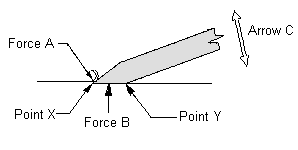
The crux of this argument depends, not surprisingly, on what is meant by the bevel: is it the whole of the bevel or only a small portion of it? On an inside curve the two points referred to above, ie the edge and the heel, should be in contact. On an outside curve the bevel should lie on the tangent to the surface at the point being cut (see Diagram 6.4). In such a case the bevel is providing less assistance to the control of the cut.


Diagram 6.4 The bevel rubbing on an outside curve

As a consequence it is easy for the beginner to lapse into a scraping action, particularly with the roughing gouge. For this reason, when spindle turning it is often found beneficial to hold the cutting edge of the tool at an angle to the axis of the lathe whilst moving the tool in the direction in which it is pointing (see Section 10.3). This has the effect of flattening the curvature of the wood; as consequence the bevel has more support.

There is, however, a practical aspect of this which needs to be considered. This is that the wood is often soft enough to deform slightly under the force of the cut. As a consequence if the curvature of the wood is not too great the bevel is pressed into the wood, so making greater contact. The effect of this can often be seen in the way the wood is burnished smooth. Sometimes the smooth finish will be slightly marred by scratches made by the heel of the bevel where it has been pressed into the wood. This is proof (if any is required) that the bevel has been rubbing along all of its length.

Some qualification of the term 'rubbing' is required - what it really means is keeping the bevel flat on the wood. It does not mean that it should always be pressed down hard on the wood. Sometimes it is necessary for the bevel to just brush the wood.


© Brian Clifford (June 1999)
Home | Intro to WT