INTRODUCTION TO WOODTURNINGChapter 13: Cutting a bead13.1 Which tool?A bead can be cut with several different tools, namely: a skew chisel, a square end chisel, a beading and parting tool, and a spindle gouge, each in a number of different sizes. The problem in cutting a bead is that it is easy to get a catch; when this happens the tool is thrown back whilst cutting an ugly spiral groove in the workpiece. In this respect a spindle gouge is easier to control and less prone to produce a catch. But it does have one disadvantage, this is that the width and thickness of the tool makes it more difficult to get to the bottom of the cut without fouling the adjacent surface. Because of this instruction will begin with the use of a chisel. (For notes on the use of a spindle gouge see paragraph 13.9 below) A skew chisel of virtually any size over ½ inch can be used to cut a bead. Either the long point or the short point (see Diagram 12.1 in previous Chapter) can be used. When I was learning to turn I used the long point because that was what the book I was following told me to do. The use of the short point provides a slicing cut which produces a cleaner surface; but, as the tool is rolled over in making the bead, the long point can obscure the view of the cutting point. In time I would recommend the novice to experiment with this tool trying both points. Initially, however, I suggest that a beginner should use 3/8 inch square beading and parting tool. In effect this is a narrow, but relatively thick, square ended chisel. If this is not available a narrow square ended chisel can be used. I feel that a smaller tool is less daunting. But whichever tool is used the technique is much the same. 13.2 The nature of the cutWhen a relatively wide chisel (eg 1 ¼ inch) is used there are two ways in which the cut can be. The reader may have noticed that when discussing chisels in the above section I have referred to the points (or corners). It is important to note that a bead can be cut either by using the corner of the chisel or by using a position on the cutting edge between the two corners, ie as when performing the planing cut. When performed by an experienced turner the use of the cutting edge produces a very clean result. (This method is shown by Richard Raffan in his video.) However, in my experience beginners are more likely to get a catch when performing the cut with the edge. As a consequence I always encourage beginners to learn the cut with the use of the bottom corner. This is described below. 13.3 The procedureLet's start with the beading and parting tool and cut the right hand side of the bead. A piece of softwood, similar to that used in previous exercises, ie two by two by twelve inches long, is fixed in the lathe and the speed set to around 2000 rpm. The square is then roughed down and planed smooth. Two 'V' cuts are then made about 1 inch apart. These set the width of the bead and provide room for the subsequent cuts.
First one side of the bead is cut and then the other. The side of a bead is made in stages starting near the edge of the 'V' and the top surface. ie point A in Diagram 13.1.
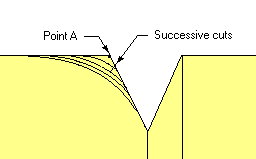
Diagram 13.1 Making a series of cuts to form a bead 13.4 The bevel must rubIt is very important to note the bevel must rub throughout the cut. However, in this exercise, what I am calling the bevel is actually only the right hand edge. This is illustrated in Diagram 13.2. (This only applies when cutting with the right hand corner of the chisel on the right hand side of a bead. When cutting on the left hand side of a bead the opposite is the case.)
If a catch occurs when a bead is being cut the most likely reason is the failure to keep the bevel in the rubbing position.

Diagram 13.2 The rubbing bevel 13.5 The first cut
The first cut is the easiest one. The starting position can be checked with the lathe switched off. The tool is placed on the rest with the cutting edge horizontal. It is then rotated, slightly clockwise (just a few degrees), around its axis and positioned with the right hand corner of the cutting edge just to the left of point A and the bevel in the rubbing position (see Diagram 13.3).
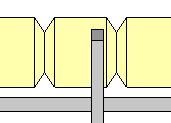
Diagram 13.3 The position of the tool for the first cut
Having switched the lathe on the first one or two cuts cut can be made just by rotating the tool around its axis. Diagram 13.4 shows that when the tool is rotated the cutting point will describe an arc. This feature can be used to cut a small radius on the corner.
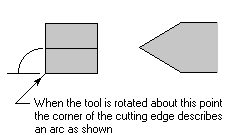
Diagram 13.4 The arc described by the cutting point 13.6 Forming the beadAfter a few cuts it will be found necessary to raise the handle and slide the tool along the rest, whilst rotating the tool. The bevel is maintained in the rubbing position by pushing the tool very slightly forward. These later cuts are all performed in a similar manner as follows.
At the start of each cut the right hand corner of the cutting edge is placed just to the left of the position at which the previous cut was started with the bevel in the rubbing position but not quite cutting. Once in this position the tool is rotated around its axis so that it will begin to cut. As soon as the it begins to cut the tool is slid to the right and the handle raised, whilst the rotation is continued. The objective now is to maintain the cut until it runs out into the side of the 'V' (see Diagram 13.5).
 Diagram 13.5 Position of tool at beginning and end of cut 13.7 The tool must slide along the restDiagram 13.5 shows the position of the tool at the beginning and end of a cut on a fully shaped bead, starting in position A and finishing at position B. When it reaches position B the tool should be in the same position as it would have been at the end of a cut on the left hand side of the 'V' (when using the swing cut). This shows why the tool must be slid along the rest; it cannot get from A to B without doing so. Beginners are apt to try to perform the cut by swivelling the tool at one point on the rest. When doing this it is impossible to form a well shaped bead. 13.8 The problems to be facedThe difficulty for beginners in cutting a bead is that a number of separate actions have to be coordinated in the correct combination. The tool has to be rotated about its axis, the handle raised and pushed slightly forward (to keep the bevel rubbing) and the tool slid along the rest. With practice these actions become automatic but to begin with it can all seem rather difficult and it may take a little time to achieve success. The following analysis may help the beginner to appreciate what is required. Diagram 13.6 Illustrates the progression of the cut in three stages, moving from A to D through B and C.
In practice the rotational and sliding movements may be made at a constant rate whilst the handle is raised at an accelerating rate.
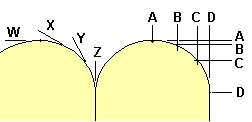 Diagram 13.6 The stages in cutting a bead 13.9 Using a spindle gouge
A spindle gouge is used in a very similar way to a chisel. The cut is made by the tip of the cutting edge. To prevent the wings of the tool catching the far wall of the 'V' cut it will be necessary to raise the handle higher than is necessary with a chisel. It also helps if the wings of the gouge are ground well back. Providing these precautions are taken it will probably be found that the gouge is the safest tool to use particularly when a catch, resulting in torn wood, would be a disaster.
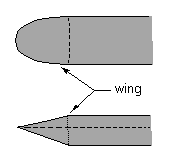 Diagram 13.7 The wings on a spindle gouge 13.10 Try, and try againFor most people learning to cut a well shaped bead with a reasonable success rate is one of the most difficult tasks for the newcomer to woodturning. To begin with catches may occur frequently. Indeed, a number of attempts may have to be made before the first success is achieved and the bead is cut without a mishap. The reader may find it useful to re-read the comments in Section 12.7 of the previous chapter. Whatever happens keep trying, don't give up, it will come in the end. When it does it is very satisfying. |