Home
Natural edge goblets revisited
How to make goblets with a really wild natural edge
| In 1991 I wrote an article for Practical Woodworking about turning
natural edge goblets - see Natural
edge goblets. Since that time I have progressed and whereas I used
to look for limbwood which was nearly circular I now look for material
with a much more irregular natural edge. Examples of these can be seen
in my
gallery. This project outlines the procedure I now use. Newcomers
too this type of turning might find it advantageous to read both
articles. Vases can be made in
a similar way. |
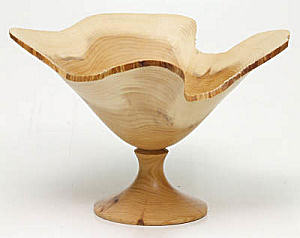
The finished goblet
The procedure
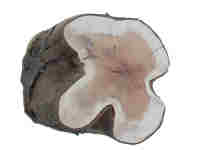 |
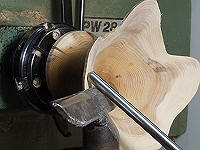
This image of the blank shows the kind of irregular shape required for these goblets. Material of a suitable shape is not always easy to find but when it is available it provides a very interesting exercise. |
 |
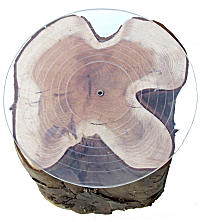
A circle has been drawn on this image which just touches
the blank at its two widest points. If the lathe centre is placed in
the spot marked "centre" the parts of the wood which just touch the
circle will form the 'peaks', ie the highest points on the turning and
the places where the wood is furthest from the circle will be the
'valleys', ie the lowest points. This blank was not ideal because the indentations (which will form the valleys) did not extend to the bottom of the piece. This meant that the valley in the natural edge were not as deep as I would have liked. |
 |
A polycarbonate (perspex) disk, which has a series of circles scribed on it, is used to find the mounting point. The disk is laid over the blank so that one of the circles touches the edge in as many places as possible. In this case the edge of the disc is used as the guide. The mounting point is marked by inserting a brad awl in the small hole in the middle of the disk. |
| The blank is mounted on a screw chuck and the outer face is cleaned up. This step is required only if a piece of scrap has to be glued on. See next item. | |
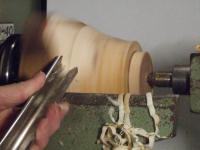
| Because the blank is short a scrap wood disk is glued to
it. The tailstock centre is drawn up to hold it in place while the glue
dries. The spigot for the chuck will be formed on this. If the blank had been long enough to provide some waste wood the spigot would have been formed on that. That would be the normal procedure. |
|
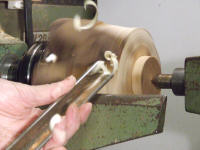 |
The tailstock is used to provide additional support whilst preliminary shaping is undertaken. |
 |
The shaping in progress |
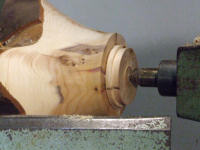 |
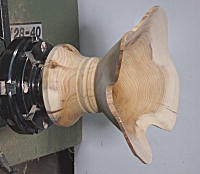
The preliminary shaping has been completed and the waste piece has been trued up, and a dovetail formed, so that the piece can be reversed onto a spigot chuck. |
 |
The piece remounted on the spigot chuck. It can be seen that some of the bark has gone. These pieces probably look better when the bark is retained but often, as in this case, some sections of the bark have already separated before any turning has taken place. |
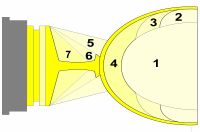 |
When turning a very thin vessel, or one with a relatively thin natural edge, it is necessary to work in stages in the correct sequence. This is shown in the diagram on the left. To start with most of the outside is turned leaving enough material to support the formation of the bowl. Then the bulk of the material from the inside is removed leaving enough so that further work can be done on the wall without experiencing vibration. After that the top half inch or so of the wall is reduced to the required thickness. This procedure is repeated until the whole of the inside of the bowl has been hollowed out. The diagram shows just three operations but in practice it is a continuous process of working steadily down the bowl. |
 |
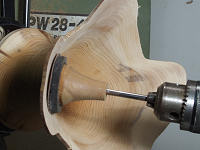
Shaping of the outside of the goblet. |
 |
The inside of the bowl of the goblet is hollowed out. Because the gouge tends to dip into the voids clean tool work is difficult and small ridges are likely to form. These can be minimised by placing the rest as close the to the piece as possible. The rest shown in this photo is very wide. I have another rest with narrow arms, which was specially made for me. This is shown in the next photo. |
 |
This shows the special rest. In conjunction with this I
often use a small bowl gouge with a bevel angle of around 60 degrees.
This helps to minimise the tendency of the tool to catch and reduces
the overhang of the tool on the rest. The benefit of this is that it
provides more control of the tool. Note that this photo was taken after the goblet was completed but it illustrates the principles involved. |
 |
The turning of the inside has been completed. The tool marks left by the gouge are sanded with a bespoke sanding disc. this should be done before proceeding to complete the work on the underside of the bowl and forming the stem. |
 |
In this photo it can be seen that the wall in the lower part of the bowl is still too thick. This needs to be corrected so that the wall is a constant thickness. When that has been done as much as possible of the underside of the bowl is sanded and finished. After that the remaining part of the bowl will be turned down to the top of the stem. This, also, is sanded and finished before the stem is turned and the job completed. |
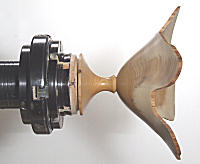 |
The finished goblet ready to be parted off. |