Home
Natural edge goblets(These notes are adapted from my article published in Practical
Woodworking in March 1991. Since that time I have progressed to making
goblets with a much more pronounced natural edge. The challengeGoblets made with a natural edge forming the lip of the bowl present an interesting challenge to the turner and the opportunity to experiment. Because these goblets involve thin turning it may be thought that they are not for the inexperienced or the faint-hearted; but don't worry, experimentation costs nothing but time. The wood can be picked up, free, out of the hedgerow or somebody's firewood pile. Dry wood is not required; unseasoned wood is easier to turn and, sometimes, as it dries it distorts into interesting and attractive shapes. The woodMost people should be able to lay their hands on some suitable wood without too much trouble. My favourite woods are hornbeam, holly, cherry and ash, but any close grained hardwood with a relatively thin bark can be used satisfactorily. For a first attempt a select a small log 4 inches or so in diameter and as circular as possible. As far as the length is concerned, I have found a good rule of thumb is to have the height of the goblet equal to the diameter. To this must be added enough material for parting-off and for the method of mounting. Holding the work and starting to turnThe simplest way of holding the work-piece, for the bulk of the turning, is to use a spigot gripped in a chuck in the compression mode. But, to begin with, the log is set up between centres. Mount the piece in the centre of each end; if the pith of the wood is off centre this does not matter. Rough the bottom end down to a bit over the required diameter for the base but leave the bark at the top of the piece. This should not be taken off as it will form the natural edge. Now form the spigot. The job is remounted on the spigot and work is begun on turning the bowl. The easiest shape to form for the bowl, and one which gives very satisfactory results, is a shallow inverted cone. To make it easier to deal with the irregular natural edge I partially shape the outside of the bowl before beginning the inside. One can shape about three-quarters of the outside to begin with, this leaves enough wood to support the bowl whilst the inside is worked on. The inside of the rim of the bowlNow for the most difficult part: the turning of the inside of the natural rim. At this stage there are two points which need to be remembered. The first is that the rim will be turned thin. The second is that the thin wood dries out quite quickly and it may begin to distort before the job is finished. For both these reasons it is necessary to work one's way down from the rim in stages. As a start, some of the waste is removed from the inside of the bowl - say about 3/4 inch deep and leaving a wall thickness of 1/8 inch. How deep one goes at this stage is a matter of judgement and depends on how much out of round the work piece is; the variations in the diameter will cause the height of the rim to undulate. Having taken out some of the waste the rim can now be thinned down. For this a very sharp tool is required - I use a ¼ inch high-speed steel bowl gouge with the shoulders ground back and a short bevel. Another essential is good tool control. To help to achieve this the support for the tool should be close to the work. Some commercial rests are so shaped that although the rest is close to the work the tool is supported some distance away, see Figure 1. This is not helpful, a better set up is illustrated in Figure 2. 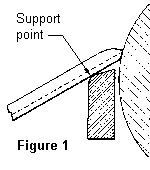 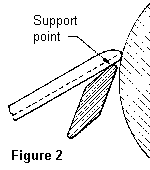 When working on the inside of a bowl with a small diameter, the top bar of the tool rest should either be narrow or slope to follow the arc of the rim, see Figure 3. This may mean that either the rest must be ground to a better shape or one must be specially made. 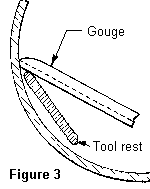 The reason for a short bevel on the gouge now becomes apparent. The shorter the bevel the closer the support will be to the cutting edge, particularly when working inside the bowl. Remember the bevel must be rubbing at all times. If necessary go back to first principles: allow the heel of the bevel to make contact with the wood first and then move the handle until the gouge is just cutting. Needless to say, very light cuts are taken. In turning the inside of the bowl of these goblets I always cut from the outside to the centre. Theoretically this is wrong because the cut will be made against the grain; but this is not a problem if the grain does not tear. In my experience it never does. The difficulty of turning the natural edge thin is compounded by the fact that because it is irregular it is difficult to see. It may help to set up a tungsten lamp behind the bed and a little above the axis of the lathe. This is manoeuvered until its light catches the extreme edge of the bowl. It also helps to position the head so that one eye is looking down the inside surface of the bowl; the tip of the gouge can then be aligned in relation to that surface. How thin one goes, or can go, is determined by a number of factors, eg the condition of the bark, the nature of the wood, the degree of irregularity of the edge, and how brave one is feeling. For ash, for example, 1/16 inch thick is often possible, holly can be made thinner still. The inside of the bowlOnce the rim has been dealt with the rest of the inside of the bowl is reasonably straightforward. To help prevent too much wood being taken out (ie cutting through the bowl) it helps to place the lamp behind it so that the light shines through the bowl from the outside. Note, however, that this can be misleading where there are marked colour changes in the wood, such as differences between heartwood and sapwood in cherry or yew. Because it is necessary to work down the bowl in stages it is not possible to take long sweeping cuts as one would on a large bowl. Also, the gouge will tend to dip into the spaces when turning the irregular edge. For both these reasons some ridges may be left which cannot be eliminated with the gouge. Then a special technique is used. This is a variation on Dell Stubb's method of shear scraping. A ½ inch scraper, with a sharp burr on it, is held pointing well downwards, perhaps as much as 45° with the burred edge at an angle to direction in which the wood is moving. The scraper is held not on the rest, but on the fingers (which can be supported by the rest). The tool is pulled across the work, from the centre to the rim, parallel to the top of the rest. This is not dangerous because, at the angle the scraper is held, there is no possibility of a dig-in. When making these goblets I use a relatively slow speed. This means that when performing this technique of shear scraping the tool will follow the work even if it has already begun to distort and has gone out of round. Using this method on end grain it is possible to get a very good surface which needs very little sanding. The outside of the bowl and the stemHaving finished the inside of the bowl attention is now turned to the outside and to the stem of the goblet. First, the lamp is moved so that it shines through from the inside of the bowl and the remaining waste wood on the outside of the bowl is removed whilst gradually cutting towards the top of the stem. Probably, it will be found that, because of movement of the wood, there is an obvious transition from the new cuts and those made earlier. Before getting quite to the top of the stem the new and the old surfaces can be blended together using the shear scraping technique described above. The outside of the bowl can then be sanded, and finished. The stem is shaped in successive stages, working from the bowl towards the base. No more of the waste wood is removed than is necessary to provide room to work in, see Figure 4. How thin the stem is be made depends on the thinness of the bowl. If the bowl is thin it will be very light and the centrifugal forces will be small; then the stem can also be made thin without the bowl showing signs of wobbling out of control as it rotates. If it does wobble then the lathe can be slowed down. 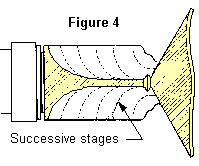 The base should also be made as thin as possible, consistent with good design, because of the danger that it might split as the wood dries out. This depends on the nature of the wood and how wet it is. It sometimes helps to dry the goblet in a microwave oven as soon as it is finished. If this is done it should be set on defrost and run for about 10 minutes. It is also a good idea to put a cup of water in the oven at the same time. But take care, one of my friends burnt through the stem of a goblet using the microwave. A word of warning: In my original article I suggested that, when working on the inside of the goblet, the fingers of the left hand should support the wood on the outside. I have since found out (the hard way) that this is potentially dangerous. One evening, when demonstrating at our club, the bowl broke leaving an ugly jagged edge on the remaining wood. As I was attempting to support the wood at the time I was lucky to get away with a superficial cut. |