Home
Please see warnings at end of article
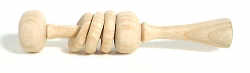
A baby's rattleIntroductionThis baby's rattle is based on the woodturners old trick of turning a loose ring on a stem or spindle - in this case there are three rings and it is these which provide the sound effects. This rattle is an interesting exercise in woodturning which makes an attractive object. I should explain that it is not my design; in fact I think rattles of this type may have been around for generations. I have found, too, that versions of it exist all round the world ( people I have talked to have seen them as far afield as New Zealand) made out of indigenous timbers. Nevertheless, the great majority of people have never seen one. Those with no knowledge of woodturning are often very puzzled as to how they are made. They examine them intently looking for a join by which would enable the rings to be added. Details of the designThe general shape and dimensions of the which I make are shown in the drawing. The dimensions need not be followed slavishly but I think this must be the smallest practical size. There are two reasons for this: one, the safety of the baby, the other, the method by which the rings are formed. In fact, before a rattle can be turned, it is necessary to make a pair of miniature skew scrapers from masonry nails. Details of how these are made are given at the end of the article. In practice a drawing is not strictly necessary; I did not make one until I came to write this piece. What I did, after some trial runs, was to mark off the relevant measurements on a strip of card. Turning the rattleWhen making the rattle I find it best to work in a set sequence. Once the blank has been turned to the required diameter the card is offered up to the job and the divisions marked on the revolving wood with a sharp pencil. Some of the waste wood is removed, and five grooves are cut, four to mark off the rings, and another to set the width of the knob in the middle. These grooves are cut with a 3/16 in. parting tool to a depth of 1/4 in. or so. The next step is to turn the handle. Although the base of the handle may be made fairly thin it will provide adequate support whilst the rest of the job is being completed. After the handle is finished the knobs are shaped and the outer edges of the rings are rounded over to a semi-circular form. The knobs are done at this point to provide more room for the miniature scrapers when parting off the rings. Cutting the ringsAfter the outsides of the rings have been sanded and oiled they can be parted off. To do this the appropriate miniature scraper is introduced into one of the grooves at an angle of 45° (in the horizontal plane) so that the point enters the side of a ring behind the rounded edge whilst the side of the tool very nearly rubs against the adjacent ring. It is pushed in until it is estimated that the point has reached the centreline of the ring. When all three rings have been cut on one side the other sides are attacked in a similar fashion. If the first cuts have been made deep enough then the rings will come free straight away. Sometimes, however, it will be necessary to make another cut from the first side, and so on. If a ring is being obstinate it can be useful to put a lamp behind it - when the cuts are close it will be possible to see an arc of light where the wood is about to part. This will indicate the point at which the final cut should be made. Whilst these operations are being performed it is necessary to ensure that cuts are not being made too far into the wood which will become the central spindle. When the rings come free it will probably be found that the inner surfaces are smooth enough not to need further finishing, but at the point of the 'V' where the two cuts intersect there will be a ragged edge. This is removed by rubbing it against the rough wood left in the middle of the piece - with the lathe running, of course. To clean up the central spindle I use first a 3/8 in square parting tool and then a spindle gouge. This part is a little tricky. It will probably be necessary to do some one handed turning using the left hand to hold the rings out of the way and, in the later stages, to support the wood. It will be found that a ring can be held between the left thumb and middle finger, the wood supported with the forefinger, whilst simultaneously, the chisel is pinned to the rest with the thumb. If this sounds complicated on paper it will not be found so in practice - it is largely a matter of doing what comes naturally. The final detailsAt this point the sides of the knobs may need their final cleaning up. This can be done with the long point of a small skew chisel taking great care - this is definitely not the time to allow a chisel to catch. As a final touch, which helps to add to the mystification of the unenlightened (as to how the piece is made), I like to cut two grooves on the end face of the handle. This is made easier if a cone centre is being used, if not it will be necessary to allow more waste wood when the piece is commenced. In either case the procedure is the same; parting off is begun and is stopped when only just enough waste wood is left to support the piece - say about 1/8 in. in diameter. Enough waste wood is then cut away to allow the two grooves to be incised with the point of a miniature skew scraper. The piece can now be sanded and oiled. Finally the waste is parted off. The miniature scrapersThe miniature skew scrapers are made from masonry nails as these provide very hard steel in a form which is easily acquired - the nails I used were the biggest I could find in the local hardware shop and measured 3 inches in length and 9/64 in diameter. No doubt there are alternative materials which could be used - an old chainsaw file, perhaps. My masonry nails were a little too thin and I found that it helped to use the heads for the cutting points. These were ground in the conventional shape for a skew scraper but I increased the angles a little with the result that the scrapers have somewhat exaggerated points. The grinding was done in three steps: first, the head of the nail was made square, then the angle of skew was ground and, finally, the cutting edge. It should not be forgotten that they must be for opposite hands, i.e. a right and left skew. The handles, which are 7 in. long with a maximum diameter of 1in, are made from ash and turned to the usual shape. The ferrules are made from 1/2 in. diameter copper tube. FinishingAs it must be anticipated that a baby's rattle will eventually go into a baby's mouth, it is necessary to consider very carefully the type of finish which is to be employed. This is important for two reasons, namely the baby's health and the legal position of the maker. The wood can, of course, be left untreated but although that would protect the maker I feel that an unsealed wooden surface is likely to pick up harmful bacteria much more easily than one which has been treated satisfactorily. But what should one use? It seems that the relevant piece of legislation (in the UK) is the Consumers Protection Act (1974) which enforces the Toy Safety Regulations. These refer to paint, varnish and similar materials, which must be free from a long list of toxic or injurious substancess. The best known of these is lead, but there are many others. In addition to these I feel that any finish which is affected by water, such as wax, or which may flake off, such as polyurethane or cellulose (even if they are not proscribed) would be unaesthetic, to say the least. For the latter reason my preference falls on some kind of oil. Teak oil may seem a suitable choice but it is necessary to ensure that the brand to be used does not contain any of the proscribed substances. The basic ingredients of teak oil are linseed oil and white spirit, which are not harmful, but the product could become contaminated by a toxic substance during manufacture. As a consequence teak oil should be avoided. My suggestions are olive oil or vegetable (rape) oil.
Please note: in earlier versions of this article I suggested using a nut oil, such as walnut, for a finish. I am indebted to Sam Roberts (a reader) who has reminded me that many people are allergic to nuts and can go into shock if they get any nut related product on, or in, their bodies. Nut oils must definitely be avoided. I am greatly indebted to Tim Yoder for pointing out that the U.S. Consumer Product Safety Division has published "Requirements for Rattles, 15 C.F.R. Part 1510". See: http://www.cpsc.gov/BUSINFO/regsumrattle.pdf Basically, if any part of a rattle can fit into a cavity with a diameter of 1.68 in (42.7 mm) and a depth of 1.18 in (30 mm) it is considered dangerous. The dimensions given for the rattle described in my article do not meet these requirements. I unaware of any similar regulations in the UK but it must be accepted that giving such a rattle to a baby is most definitely undesirable. I have left the article on my site as: It serves as a warning about the danger of small turned objects to babies; It is an interesting technical exercise which may have applications to other turned objects. (July 2005) |
© Brian Clifford (August 1999)