
 Making a pencil pot
|
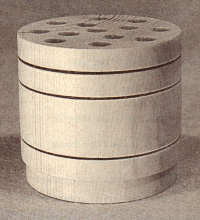
A pencil pot is a simple, but very useful item, for beginners to make.Almost any wood can be used, hardwood or softwood. However, the latter is quite adequate and is what I use for a production run. Sawn softwood can be purchased fron the local timber merchant.I cut this into pieces 2 1/2 inches long. The side which will form the base is sanded before the work piece is attached to the lathe. This will become the top of the pot when it is finished.
|
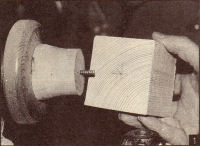 |
The photo shows the blank about to be attached to the screw chuck. The hole for the screw will eventually be drilled out to accomodate a pencil or pen so a larger screw than that shown here can be used.
The piece is roughed down the round and then planed with a skew chisel. The planing cut is started about 3/4 of an inch from the right-hand end. Only a couple of passes with the skew should be required to achive a smooth finish. Then the cut is reversed to finish the extreme right-hand end.
The next operation is to clean up the bottom of the pot. This should have a slight hollow so that the finished pot will sit firmly on a surface. It can be cut with a skew chisel but, because the tailstock is not in the way, a small bowl gouge can be used. The step at the bottom is then made using a small chisel.
|

|
Now the only thing to be done before sanding is to add the decoration by burning with wire. First a very small groove is cut with the point of a chisel to locate the wire and to stop it sliding around. The wire is looped in a 'U' shape around the pot and held firmly in position until it gets hot enough to burn the wood. The smoke created by this process can be seen in the photograph. Thin, flexible wire is required, 18 gauge or thereabouts. It can be soft iron or, possibly, single strand copper wire stripped out of some mains cable.
|
|
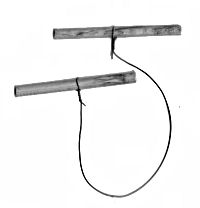
The wire must not be held in the fingers (as shown in a photograph in one turning manual) because sometimes the wood grabs the wire and gives it a very sharp tug. This could cause a nasty injury to the fingers. Instead the wire can be attached to a couple of little toggles which can be made out of scrapwood or dowel.
|
|
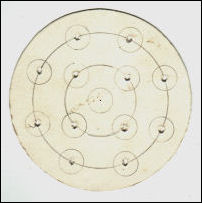
After the rings have been burnt-in and the piece removed from the lathe the holes for the pencils etc. are cut. These can be drilled in a random manner but I prefer to use a regular pattern. The template I use to do this is shown on the left. The template is held on the top of the pot and the centre of the holes marked with a bradawl.
|
|